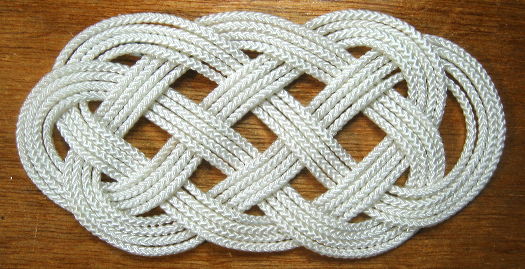
Aboard ship, a thump mat is used as padding to prevent an opening bulkhead (door) from slamming against the wall to which it is attached. As with so much utilitarian nautical ropework, the need for interlocked weaving inspired decorative forms. The miniature three-strand thump mat shown here, measuring 4 inches across the middle, certainly wouldn't serve as bulkhead padding. But it makes a nice wall decoration, or a (slightly slippery) trivet or coaster.
How to Make This Kind Of Thump Mat
(there are other kinds)
My experience making these mats got a considerable boost when I spent six weeks in a hospital. I decided to make a mat for each of the hospital staff who helped me, as I met them over the six weeks -- cleaning people, nurses, doctors, administrators. In the end I made over seventy mats. It was possible to make them all the same size because I'd become interested enough to build a jig for the purpose.
The instructions here make use of diagrams I drew for a cleaning person on the hospital staff who turned out to be a master basket maker in her spare time and was curious about the technique. They are accompanied by what the cord looks like at each stage, using the jig to hold them in place.
|
The Cord
A note on cord -- I've used the kind of white nylon braided cord that is available in spool form in marine or commercial-fishing supply stores -- 1/8" thick. I used to be able to get the spools wound in parallel, the way sewing thread is wound. Lately, it seems the manufacturers of the cord in the local stores where I live have taken to wrapping the cord diagonally on the spool, which causes a kink at each place where cord crosses cord, making it almost useless for this kind of decorative purpose. The only solution I've found so far is to cut the desired length (nine feet in the case of this 4" mat) and then hang it up with a weight hanging from it for several days, which makes the kinks a bit more manageable. Anti-fray the ends -- Before you start, use a flame to melt the ends so they won't fray while weaving. A butane lighter or gas stove is better than a match or candle, since the latter two will soot up the cord ends. If you can, immediately after meling the end of the cord, pull it quickly out between your thumb and first two fingers while the end is still soft, to give it a slight point, making a "needle" for weaving. If you do this fast enough, you won't burn your fingers. Protect against kinking -- The twisted cord used for making wristlets has a tendency to curl and kink when pulled through tight weaving spots. The braided cord used here can also kink up, not because of twists (it's braided), but because of the built-in curl it has when it comes off the spool. And because it is so stiff, those kinks can completely derail the loop pattern you are trying to build. To avoid this, I've found it necessary to spend a bit of time getting rid of that curve by taking steps to reverse it enough for the cord to be relatively straight. You can run it over the edge of a table, or pull the edge of a ruler along it, or use your fingers (but watch out for rope burns).
|
||
Figure 1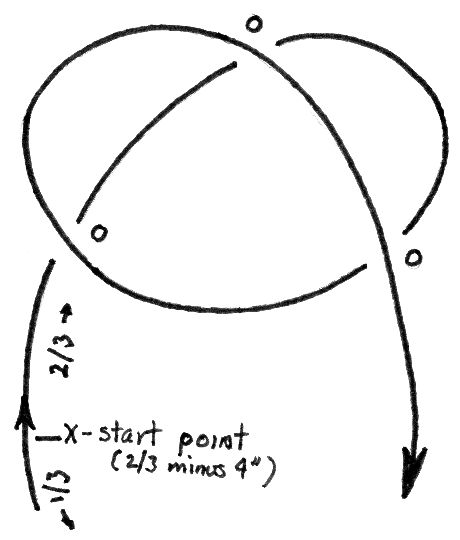
|
As with the three-strand wristlet, the three-strand thump mat starts with a one-strand skeleton, which is then "woven along" twice. And so, like the wristlet, the cord is divided into two sections, one twice as long as the other. The double-length section is used to build both the skeleton and the first weave-along, creating a two-strand mat, and then the single-length section is woven along to create the final three-strand mat. The first step is to use two loops to create a heart shape. The "O's" that lable the intersections in the diagram indicate that the cord you're looping with is going Over the cord that has already been laid down. The first loop should cross the original cord about 4" from the 2/3-|-1/3 division point to allow for additional loops below it. |
Figure 1a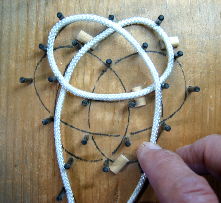
|
Figure 2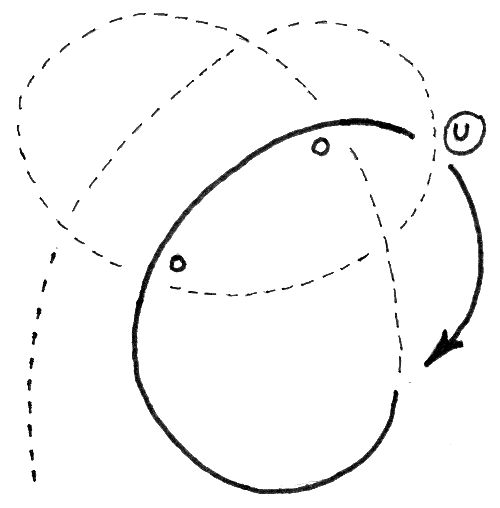
|
In this and the subsequent diagrams, the part already laid down is shown as a dashed line. In this step, the label "U" is used to show an instance in which the active cord is threaded Under the cord which has already been laid down. |
Figure 2a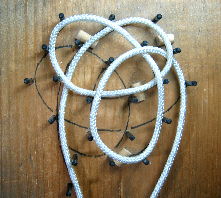
|
Figure 3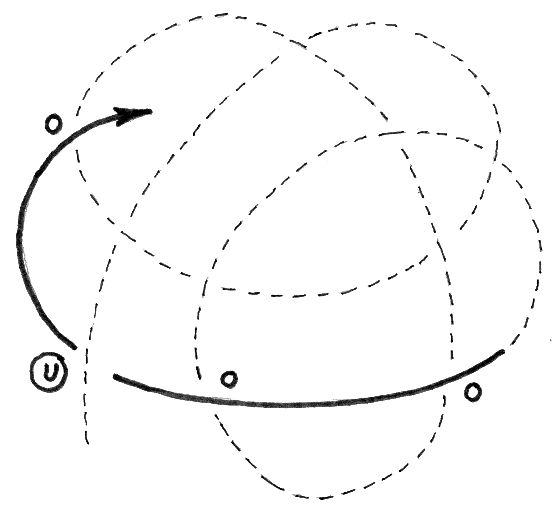
|
By this time, the mat skeleton is getting a bit unwieldly, and you pretty much have to hold it down on a surface to keep it from getting out of hand, which does make the "under" weaves a little challenging. When I decided to make a number of these mats, I ended up building a jig that serves not only to hold the cord in place, but also guarantee a consistent result in terms of shape and size. |
Figure 3a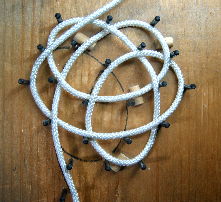
|
Figure 4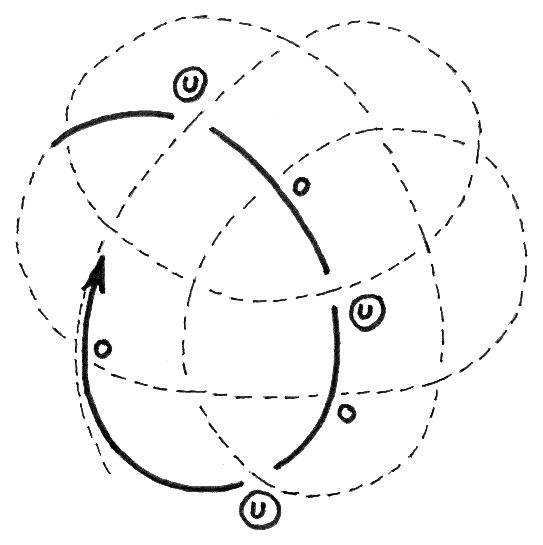
|
This last skeleton-building step is the trickiest because of having to do three under-weaves between over-weaves. |
Figure 4a
|
|
Once the skeleton is finished, it will hold together well enough to work with (or to remove from the jig if one is being used). You are now ready to start the second strand weave-along. As with the three-strand wristlet, this is a mindless process of following exactly alongside the existing skeleton cord, staying on the same side of it (never crossing it) and doing the same over and under intersections. I say "mindless," but not attention-less. A moment's inattentiveness can get you started in the wrong direction. Before starting, it is a good idea to pull the various loops until the mat is fairly close to the even shape shown in the picture above. You will be doing the same kind of adjustment when the mat is finished, but it is a good idea to start the weave-alongs with something close to the final shape. |
Figure 5a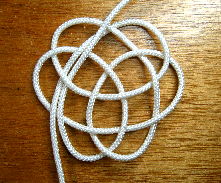
|
|
Two-strand Thump Mat
|
Once the second strand is finished, pick up the idle single-length cord (running across the bottom at the right) and start a weave around in the opposite direction -- again, being careful to hug the existing cord, not crossing it and mimicking the overs and unders. Two-strand note -- You can stop here without making a third pass. The resulting two-strand mat (left) is pretty and airy, but the lack of a third strand makes it flimsier and more prone to distortion with use. |
Figure 6a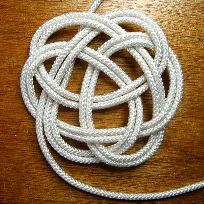
|
|
Once you have a full three-stranded mat, find a place where the ends can slightly pass each other (briefly four-stranded) behind one of the other three-stranded curves. Cut the ends with a very sharp scissors, so as not to fray them. It is important to get the measurement just right, so that each one lies fully across the curve they will be hiding behind, but not projecting beyond. Melt the ends with as little heat as possible. Part of the fun of this mat is how there seems to be no end, and if the cord ends are blackened or dark, they stand out and give away the secret too easily. I use Duco cement to finish the job. Because I want all the curves to be free of each other to shift around so they can all be made nice and even, I put a strip of waxed paper under the "4-strand" area that I'll be gluing, to keep it separate from the curve on which it is lying. Then I put Duco cement on the "inside" edges of the two ends, so that they will stick to the cords immediately adjacent to them. I then apply pressure to the area with a clamp. Once the glue has dried (give it time!), you can push and pull the lobes until the mat looks neatly symmetrical. Rotate the mat 1/3 turn each time you think things look good. The mat should look the same in each of the three positions. |
Figure 7a
|
|
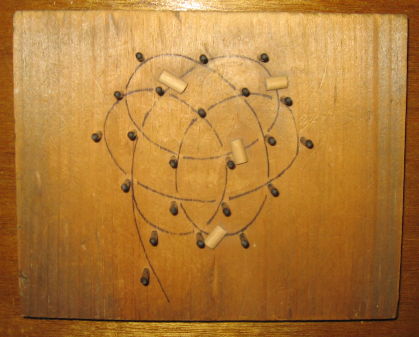
A Jig for Building This Thump Mat
A thump mat can be made freehand quite well -- I'm sure sailors did it all the time. But when I decided to make more than a few, and wanted to save cord by knowing pretty accurately how much I needed for each mat (small changes in size can make a big difference in the required length of cord), I decided to build a tool that would guide the cord pattern for the initial skeleton. It's just an old piece of wood on which I drew the pattern from Figure 4. I inserted little dowel posts at each intersection and at the outer edges (midpoint) of every loop:
 |
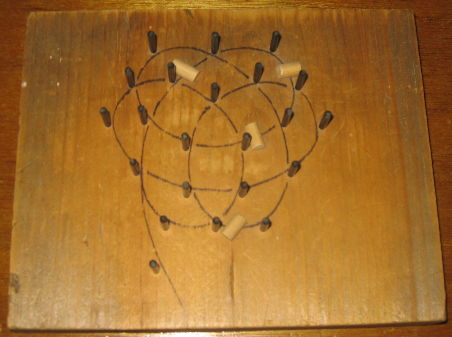 |
This jig measures across (inside the pins) 3-1/4" at the narrowest to 3-1/2" at the widest. The little half-round blocks raise the cord as it first passes through, to permit the "under" weave that comes later.
Other Forms
There are also more complex variations. Here's an example: