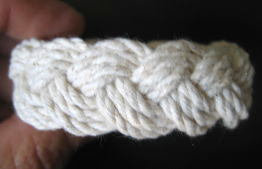
I learned how to make these wristlets from the late Capt. Ted Spurling, Sr., a lobsterman who learned a remarkable repertoire of knots and decorative rope work while in the Merchant Marine. He sold his wristlets (and other decorative work) in gifts shops along the Maine coast. With no pretenses to his craftsmanship, I make these wristlets while riding a small passenger ferry out to Ted's small island in Maine. The wristlets are sold in a small gift shop on that island, which helps pay the price of the ferry tickets.
How to wear -- I have not worn a wristlet. However, my understanding of their use is as follows:
- Soak the wristlet in water. It expands when it's wet, and then shrinks back when it's dry. If it goes over your hand when it's dry, it's too big.
- Pull it over your hand. If it takes a battle to pull it over your hand (when it's wet), it's the right size.
- Let it dry -- it should shrink to a comfortable fit.
- Wear it until it rots off. Or if a change in your concept of fashion occurs, cut it off.
Detailed, but simple -- This page is kind of like being told by your second-grade teacher to write down a set of instructions for tying your shoe. The instructions may seem long and involved, but only because they take you through the relatively simple process in many simple steps, with enough detail to (hopefully) avoid confusion. The process itself really isn't very involved. If you follow through step-by-step, the details will help protect you from making the kind of mistake that makes it necessary to take the whole thing apart and start over.
Caveat -- I am not a photographer, and I had to shoot these pictures one-handed. So some of them are not beautifully focused. I apologize for that, but I think you'll get the idea.
|
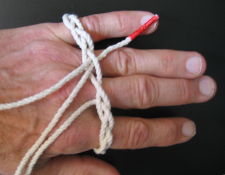
IMPORTANT: Right-hand note -- These instructions are for right-handed people, for whom the active weaving hand is the right hand, and the hand that holds/manages the growing wristlet is the left. If you're left handed, you probably will want to reverse this, and any mention of "right" or "left" should be reversed.
|
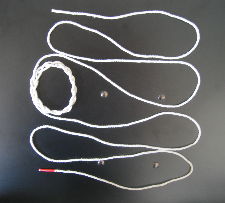
SUPPLIES NEEDED
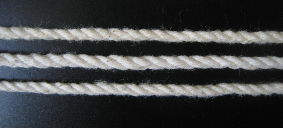
- #36 Cotton cord (see Cord Issues note at end)
- 1" Masking tape
- Sharp scissors
The tools I use are shown at right:
* A folding scissors is easy to carry around.
* Masking tape rolled on a pencil is smaller than a roll of tape.
If you're using a spool of cord rather than a ball, it helps to have an "axle" to put through the spool to hold between your knees to spin the cord off the spool. (I use a thin cardboard tube.)
|
|
 |
BEFORE YOU START: PREPARING THE CORD
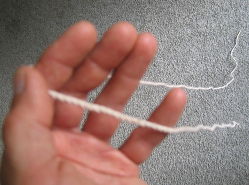
Cord length -- I've found that about three arm lengths (i.e., from pinched thumb/forefinger to the neck) works for wristlets built around a hand the size of my hand (about 8" around the top of the palm); this length is about 7 feet. The relationship between hand width and wrist size varies, though, so you might want to use a bit longer piece. It's frustrating to spend the time making a wristlet and run out of cord just before the end.
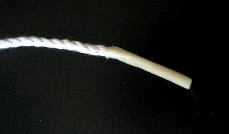
Making a "shoelace end" -- This is essential. Twisted cord unravels and can't be pushed through sometimes-tight openings in the developing braid. I originally used Elmer's glue to stiffen the ends of the cord, but this method is a LOT easier and more effective.

|
Lay a piece of 1" masking tape (about 2" long) face up on your knee. Then, to get your fingers free of the tape, lay the cord (close to its end) along the tape's bottom edge, just far enough onto the sticky part to engage it. Then roll the cord a little bit onto the tape, so that the edge of the tape comes around to where you can press it onto the cord for a good grip (shown at left). Then finish rolling the cord until. . .
|

|
. . .the cord has a cylinder of tape around it. Then cut the cylinder in half. . .
|
|
. . .leaving two cord ends, each with a "shoelace end."
|
Do this once at the beginning of the cord, cutting off and discarding the short remainder. Then do the length measurement, and at that position do a second shoe-lacing. You'll then have a complete ready-to-use cord and the beginning of another one if you decide to make more.
MAKING THE WRISTLET
(A Table of Contents)
- Divide your length of cord into three sections.
- Round 1: Build the skeleton braid of the wristlet around your hand, using the middle section of the cord. This is the "trick" part, and results in a single strand braided into a continuous loop, with the two other equal-length sections of the cord hanging off it. The rest is mindless repetition (which is why it's so easy to make mistakes!).
- Round 2: Continue with the end of the cord you've been working with to weave that section of the cord into the skeleton of the wristlet. After you've gone around the wristlet with this section of cord three times, the wristletbraid will be two-stranded.
- Round 3: Flip the wristlet over and do the same thing with the other end, finishing with a braid consisting of three strands.
- Finish: Tie the two weaving cords, which have come out inside the wristlet quite close together, in a square knot and clip the excess off.
- Other uses: Wristlets aren't all you can make with this technique.
|
|
DIVIDING THE CORD
This is one way to do it. Because I had to hold the camera in my right hand, I've used clips in this picture to represent that right hand.
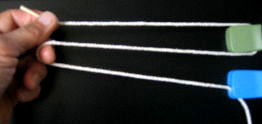
- Pinch the shoelace end between your left thumb/index finger.
- Pick up the cord about 6" away with your right thumb and index finger (the green/upper clip in the picture).
- Pick up the next 6" of cord with your left middle finger. Now the string around your right thumb (green/upper clip) is a loop, so you can stop pinching the string with your right thumb/index finger and slide your thumb into the loop until the string rests in the crook of your thumb.
- Hook your remaining right fingers (middle/ring/pinky, represented by the blue/lower clip) under the remaining cord to support it; you can press it lightly between these fingers and your palm to keep it from zipping out too rapidly in the next step.
- You now pull your hands apart, letting the cord slide around your left ring finger and the crook of your right thumb (green/upper clip), and over your supportive right fingers (blue/lower clip), until the far shoelace end arrives in your right hand, and give it a pinch to stop it.
- You then drop everything but what's around your left middle finger, leaving two ends dangling, one twice as long as the other.
- Move the longer one over the top of your hand so the string is dangling freely from the top edge of your index finger, the long part dangling down the back of your hand, the shorter part down the front of your hand.
- You're ready to begin.
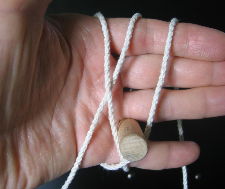
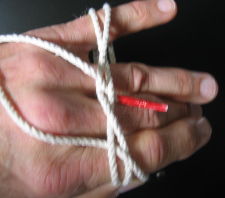
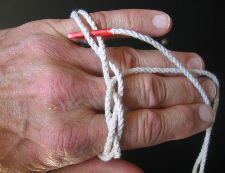
ROUND 1: THE SINGLE-STRAND WRISTLET SKELETON
Note -- You build the wristlet around your hand, so the eventual size of the wristlet depends partly on how big your hand is. But it also depends on how tight or loose the cord is when you wrap it around your hand when you start. It makes sense to start with the cord neither loose nor tight. Then, if the wristlet ends up too small or too large, you know to start its replacement more loosely or tightly.
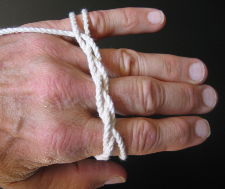
| 1. |
|
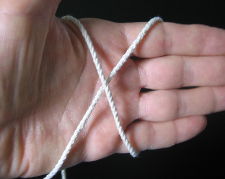
Bring the weaving end (the shoelace end of the longer segment hanging down the back of your hand) up around in front of your hand and TOWARD YOUR THUMB, crossing over the the cord that's already there to make an X, taking it over the top edge of your palm (nearer the thumb) and back down the back of the hand. (Next it will be brought up around the front of the hand again, this time between the two bottom legs of the X.)
|
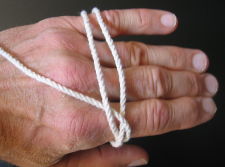
| 2. |
|
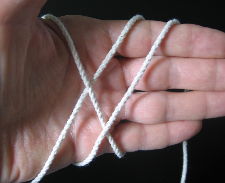
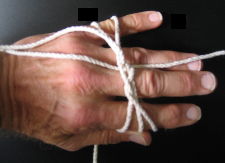
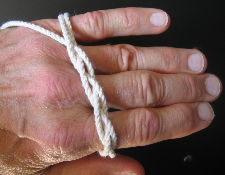
Continue, bringing the cord around to the front of your hand again and up between the X's bottom legs. Cross it to the right (TOWARD THE ENDS OF YOUR FINGERS) over the right-hand bottom leg of the X -- making a second X -- and hang it back over the top of the index finger, so it drops behind the hand again.
|
| 3. |
|
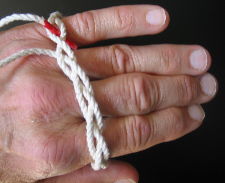
Since I needed my right hand for the camera, the dowel in the next few pictures represents your right index finger.
Put your right index finger above the newly-formed lower-right X (but don't stick it between your fingers as I had to do to hold rhe dowel). Push the X down toward the bottom of your hand, and then continue pushing around the bottom of your hand, turn your hand over (palm away from you) and . . .
|
| 4. |

|
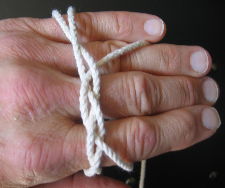
. . . continue pushing the X down the other side, until the X has been pushed all the way around to near the index-finger side of the back of the hand. Now you're ready to start the braid-weaving.
(In this picture, the long strand that you'll first be weaving with is the middle one on your pinky finger.)
|
| 5. |
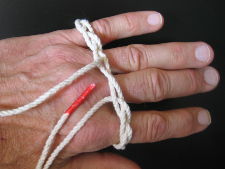
|
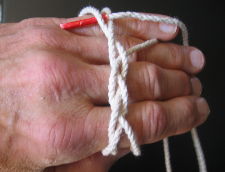
Reach down and grab the end of the cord just mentioned, shown in red here and in subsequent pictures.
Weaving the skeleton is done by repeating a pattern of two steps.
STEP 1: Cross the weaving string OVER the (now) upper-right leg of the X (this is the "NEAR" cord, the one NEARest the side that the shoestring weaving cord is coming from coming from) and then UNDER the upper-left leg of the X (the "FAR" cord, the one FARthest from the side the weaving cord is coming from).
Note that you're starting by going OVER the NEAR cord which itself had gone OVER another cord just below where you're weaving. (This is RULE #1 of what will eventually be three basic rules). You end up with . . .
|
| 6. |

|
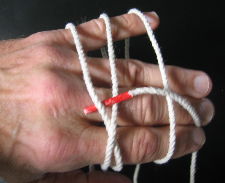
. . . this over-under pattern. This process will repeat itself back and forth across the two stationary (X) cords, with one extra rule, RULE #2: never go over a cord you've just gone under. So everything that happens now follows these rules. Remember them:
| RULE #1. |
Go over the NEAR cord (which previously went over another cord) and then go under the FAR cord. |
| RULE #2. |
Never go over a cord you just went under. |
But wait! If you try to follow these rules to repeat this for the next step, using RULE #1 go OVER the NEAR cord, given the way things are, you'll violate RULE #2, since that cord is the one that you just went UNDER.
This going over a cord you just went under was the most common mistake I encountered in a workshop I taught on making wristlets. So what should you do to avoid it?
|
| 7. |
|
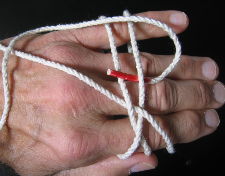
Half the braid-weaving steps in building the wristlet skeleton will be STEP-1 type steps, simple over/under. The other half, alternating with these simple ones, will present this problem, which is solved in the following manner.
STEP 2: Make the FAR cord -- which you DIDN'T just go under -- the NEAR cord, so you can go over it without violating RULE #2. You do this by dragging the FAR cord back across the NEAR cord, so that it becomes the new NEAR cord.
This picture shows how to start this. You take the weaving end OVER both cords, and start to come back under the FAR cord, far enough that the shoeslace end lies across the NEAR cord.
|
| 8. |
|
You then use the shoelace end like a lever to pry the FAR cord back over the NEAR cord (and the NEAR cord under the FAR cord), as is happening in this picture. This creates a hole that you can put the cord through.
|
| 9. |
|
Once you've pried the shoelace end all the way around, it's pointing in the direction it just came from, the direction you want to be heading in this STEP 2.
You can see that what WAS the FAR cord with respect to this STEP 2 direction is now the NEAR cord, and vice versa.
|
| 10. |
|
Pull the cord through the hole, to end up with . . .
|
| 11. |
|
. . . this kind of pattern. You're now on your way. You're going to be doing the same thing you just did -- STEP 1 and STEP 2 -- over and over. At this point, you're ready to start easily, because . . .
|
| 12. |
|
STEP 1: . . . the cords are already crossed. So when you do the over/under weave you will be going OVER a NEAR cord which hasn't just gone under a cord (RULE #1), and that cord also isn't the one you just went under (RULE #2).
|
| 13. |
|
This results in the braiding pattern that you will see over and over again. It's good to get used to it, so you can spot when you make a mistake.
The trouble here is that you've run out of room to continue on the back of your hand, so . . .
|
| 14. |
|
. . . with your other hand you pinch where you just braided and pull it down toward your index finger so the whole thing rotates around your hand, leaving you another whole hand-width to work with, and you're ready to start another STEP 2,
|
| 15. |
|
STEP 2: Again, you use the shoelace end to pry the FAR cord back over the NEAR cord so it becomes the NEAR cord, creating a "hole" to go through (as in Figures 8 & 9, above), and . . .
|
| 16. |
|
. . . pull the cord through the hole, creating that soon-to-be-familiar pattern. Then you again do . . .
|
| 17. |
|
. . . STEP 1, going OVER the conveniently available NEAR cord and under the FAR cord, and . . .
|
| 18. |
|
. . . pull it through, and start . . .
|
| 19. |
|
. . . STEP 2 all over again by going over the FAR cord and prying it back with the shoelace end to make it the NEAR cord (as in Figures 8 & 9, above).
|
| 20. |
|
You keep doing this until you can count 13 braid curves (along either edge of the skeleton you're creating. It's easiest to start counting at the point where the other cord comes out of the braid. (Note: for very small wristlets, it may be necessary to do only 11 curves, since the weaving may otherwise get too tight to finish.)
|
| 21. |
|
Finish by threading the cord through the hole alongside the other cord. The way this is being done illustrates RULE #3, which governs the rest of the weaving:
| RULE #3. |
Do NOT cross over the cord you're weaving along --
stay on the same side of it at all times |
|
| 22. |

|
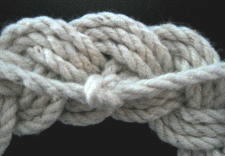
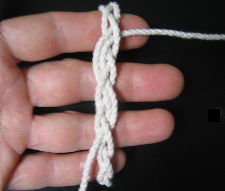
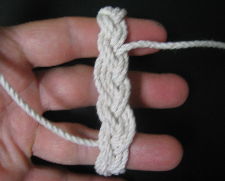
This completes the first-main-round single-strand skeleton.
|
| 23. |
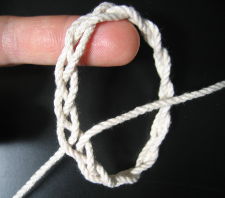
|
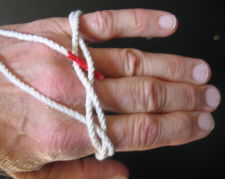
You can now take it off your hand. It might be a good idea at this point to mark the end you've been weaving with so you don't lose track of it. Round Two should be done with this end, and Round Three with the other. I've found that doing these the other way round is much more difficult.
|
| 24. |
|
You've just used the middle third of your original string for the skeleton. The two ends that are left should be about equal length. Hold the skeleton up and let the ends dangle to check. (Because I couldn't get a good picture of this, I've laid the ends out in such a way as to show that they are about equal.) The end you've been weaving with will go on to weave Round Two, and the one you haven't done anything with yet will be used for Round Three.
|
| 25. |
|
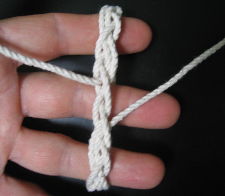
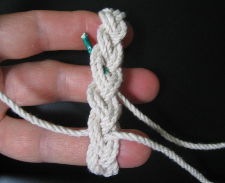
Before you start Round Two, go around the wristlet and check to see if the braid loops are all more or less the same size. Often, as you get closer to the end of the first round, you begin to run out of room, and the last few braid loops before the meeting point get jammed up, as in this example. Small loops can be a particular problem as you get into Round Three, where there are three strands crowding the situation; the weave can get so tight that it's hard to thread the cord through.
I've found that you get better results if you take the time at this point to even out the size of the braid loops by using your thumb and index finger to push (or pull) the braided cord in such a way as to open up smaller loops a bit by pushing them into the larger loops.
When you start weaving, particularly in Round Two, you'll notice the loops into which you're threading will naturally get temporarily stretched, but this tends to average out over the whole wristlet.
|
ROUND 2: GETTING TO THE TWO-STRAND WRISTLET
Note: the photographs here show the wristlet on the fingers, but this is just for the purpose of one-handed photography. You'll actually just be holding the wristlet between the thumb and finger(s) of the left hand.
| 26. |
|
You now start the second third of the job, during which you will weave alongside the other cord -- the one whose exit you just arrived at -- obeying RULE #3: keep following that cord snugly, but ALWAYS STAY ON THE SAME SIDE OF IT. (You can forget about RULES #1 and #2 -- they don't apply to the rest of the weaving.)
It's easiest to do the weaving one unit at a time, each unit being an over-under-over-under followed by a light tug.
Here is the first over-under. Notice the shoelace end is staying on the right side of the cord that it will be following -- the one along side of which it is lying in the picture.
Pull just enough of the cord through (maybe an inch or so) to do . . .
|
| 27. |
|
. . . the second over-under of this first basic weaving unit. Notice we're still staying on the same (right) side of the cord being followed -- RULE #3.
|
| 28. |
|
Here's the first over-under-over-under unit before pulling the cord through.
|
| 29. |
|
Once the cord is pulled through, you give it a little tug. This tends to cause the cord you've been following to loop a bit away from the weaving cord. To even things out, put your right thumb into the wristlet at the top (index finger end) and give it a few gentle tugs. The excess loop should disappear . . .
|
| 30. |
|
. . . like this, and you can start the second over-under-over-under unit. You continue weaving these over-under-over-under units until . . .
|
| 31. |
|
. . . you get back to where the loose cord is hanging out.
Notice that two of the braid's strands are still single, but one -- the one you just did -- is now double.
|
| 32. |
|
Now you start in on the first weaving unit of the next circuit around the wristlent, using the same initial over-under move.
IMPORTANT: During Round Two, each time you start another circuit, the strand you're moving along should be increasing from one to two strands. If it's suddenly three, you've made a mistake and you'll need to backtrack and fix it. The most common mistakes that cause this (due to mindlessness or overconfidence) are
a. getting on the wrong side of (accidentally crossing over) the cord you're following, or
b. skipping a loop of the braid.
You continue this second circuit until . . .
|
| 33. |

|
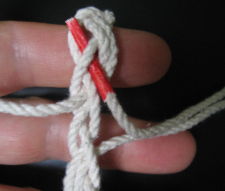
. . . you get to the loose cord again. Now the wristlet has two double strands and one single strand. You double this last single strand by continuing around for the third circuit.
It's important, as you start this last circuit, to go under BOTH the already woven cord and the loose-end cord, as shown here. An all-too-easy mistake is to fail to go under that loose-end cord.
As always in Round Two, as you go around the circuit, make sure you're doubling a single strand, not tripling a double strand.
|
| 34. |
|
When you arrive at the loose cord once again, the final weaving unit of Round Two is an over-under-over-and-IN, shown here. You then pull the cord into the wristlet and leave it inside for later tying off.
|
ROUND 3: GETTING TO THE THREE-STRAND WRISTLET
| 35. |
|
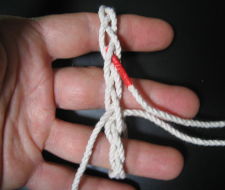
You then rotate the wristlet halfway around so that the so-far unused cord (the third segment of the cord you started with -- shoelace end shown here in green) is on the right and pointing up. With it, you start the first weaving unit of Round Three.
The feel of Round Three is different, even though the basic unit is still over-under-over-under. This is because you start with the cord already lying over the cord it must start over, so the first "action" seems to be an "under." Also, where Round Two was "over-under pull-out-a-bit over-under," Round Three is "over-under pull-out-a-bit over pull-out-a-bit under." An extra pull-out-a-bit is needed before the last "under" because it is coming up between two braids, and because weaving can get very tight as you approach three full three-strand braids.
Here's the first over-under-over, again staying to the right of the cord being followed (RULE #3). It's a bit misleading because I skipped the first pull-out-a-bit, which usually isn't easy.
|
| 36. |
|
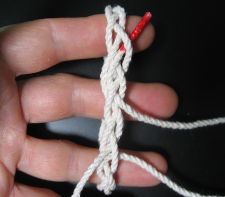
Here's the completed first over-under-over-under weaving unit. You can see the three-strand braid beginning to appear.
|
| 37. |
|
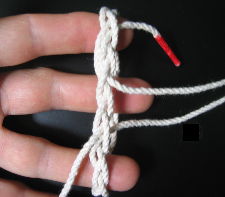
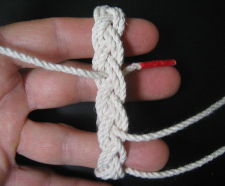
Continue around on this first circuit until you get to the loose cord (the one with which you finished Round Two). You now have two double strands and your first triple strand.
Triple strands can sometimes begin to get rather tight for pushing your shoelace weaving end through, especially with smaller wristlets. Weaving in a tight situation is also made difficult by the fact that pulling twisted cord through a tight area can cause it to coil up on itself.
So sometimes it helps to loosen up the area you're about to go through by grabbing (pinching) the loops on either side of that area and pulling them apart. Here, the holes for the under-over part of the next weaving unit have been opened up in this way by pulling apart the 2-strand and 3-strand loops that are in front of the middle finger in this picture.
|
| 38. |
|
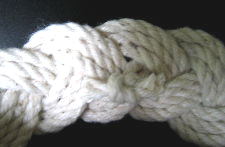
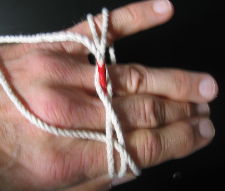
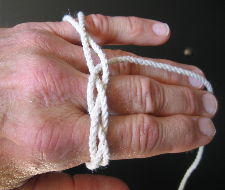
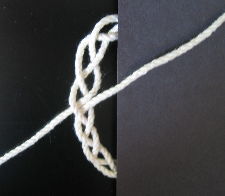
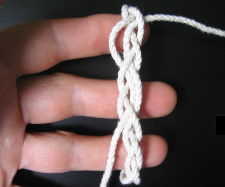
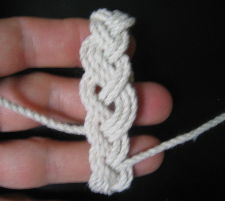
As with Main Round 2, you go around three times, passing the loose cord twice. When you come to it the third time, you should have a 3-strand wristlet. You end it by doing the same kind of over-and-in move used to end Main Round 2, so that both cords are now inside the wristlet, next to each other, looking like this.
|
Didn't come out right?
If at some point you find yourself starting a fourth strand while there's still a double strand present, or if the cords at this point are either past each other or are farther apart, chances are you've violated RULES #1 OR #2 during the skeleton-building, or violating RULE #3 by failing to stay on the same side of the cord you were following while doing the weaving.
Sometimes you can find the place where the problem occurred just by looking at the familiar pattern and seeing where it goes wrong, and you can unweave back to that point. But sometimes it really is impossible to figure out where it happened, or how to make it right, even if you do find the problem. If that happens, just unweave the whole thing and start over, or throw it away and make a new one.
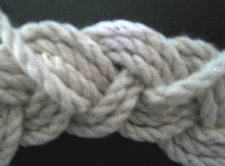
FINISHING OFF
If you have questions, maybe I can help -- wristlets %(no, use that other character) dickatlee.com .
OTHER USES
|
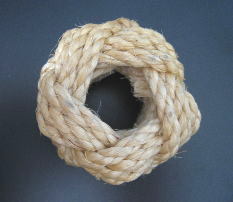
This basic form is called a "Turks head." It can be used with a smaller diameter and a varying (but odd) number of strands to make napkin rings (or Boy Scout neckerchief clasps)
|
|
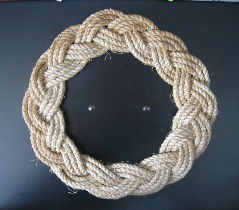
Or, if you use rope, at the point at which the first-strand skeleton is finished, you can open it out flat and continue as usual, in which case you wind up with a very nice trivet.
|
|
In this case you don't finish with a square not, but rather whip the ends (or glue them) and then glue them down where they reach their overlap.
|
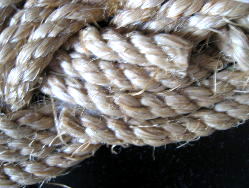
Cord Issues
|
Wellington Gardening Twine #36 (used here)
Ted's original Ace Cable Cord #36 (no longer available)
Wellington Puritan Cable Cord #36
|
Captain Ted Spurling used Ace Cable Cord, size #36. When he died, I inherited a number of his balls of that cord, and made the mistake of taking for granted that it would always be available. When I ran out, I went the Ace Hardware and bought more of it. But the new cord was different -- thinner, harder, and off-white -- in spite of having an identical label and SKU number. It made ugly little wristlets.
I called Wellington, the company that "makes" it. They said their supplier had switched to having it made in Mexico. I found another Wellington #36 Cable Cord branded "Puritan." It was better, but not much.
I searched all over online, finding mainly only these two. Eventually I found a company in Indiana that had a cable cord made by Aamstrand. It looked right and I ordered their case of a dozen. It turned out to be #48 (they didn't make #36), and though it was beautifully white, it was much thicker and the wristlets it made were clunky. The company was nice enough to accept a return.
Eventually I checked the True Value hardware store in Bar Harbor. They had another Wellington cord, called Gardening Twine (also #36). It isn't the same as Ted's Ace Cable Cord. It is slightly thinner (less soft bulk) and slightly less white. But it seems to be the best available, and is what I've been using.
Revisions
| 27 Jul 12 |
Fixed numbering error (39ff). Brightened initial pictures and #38ff. Rewrote many instructions with the perspective of another year and in expectation of the July 31 Great Cranberry class. Created an independent PDF version. |
| 10 Aug 11 |
Redid pictures 25-41 to correct focus and use colored shoelace ends (which as plain tape were hard to see in the initial pictures). Added email address. |
| 5 Aug 11 |
Numbered pictures, redid pictures 1-24 to correct focus, rewrote many instructions in light of July 26 workshop at Carroll Homestead. |
| 23-5 Jul 11 |
Original posting. |
-->