 |
 |
Lobster Plug Name Rings
Dick Atlee
Updated: 4 April 2012
(back to Crafts)
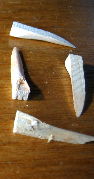
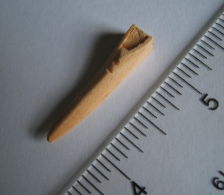
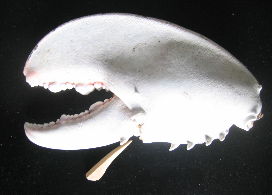
Back in the "old days," say, as recently as 20 years ago, fishermen who caught lobsters would protect themselves from being attacked by their quarry by "plugging" the lobsters' claws, using small wooden plugs to jam the "thumb" of the claw against the rest of the claw:
|
|
However, the hole through which the plug was pushed had a membrane, and once that was broken, infection became a potential serious problem. So the industry turned to small, extremely strong rubber bands. Suddenly there was no use for the lobster plugs. Our local fishermen's co-op had a large quantity that were going to be disposed of. We couldn't bear to see that happen. The plugs are actually quite an elegant form, with all kinds of possible uses. So we took the supply.
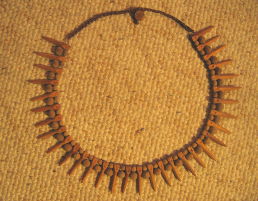
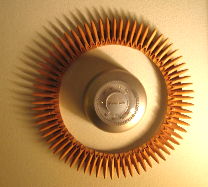
Some of the uses have been as "bones" in "African-style" necklaces, (shown below with a close-up) and as rays in lobster-plug sunburst "wreaths:"
 |
 |
 |
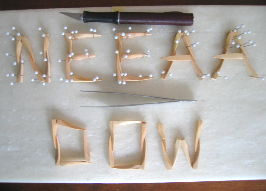
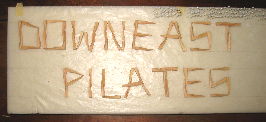
But they also have a thin-to-thick profile that allows them to be formed into letters that look vaguely like Japanese brush painting:
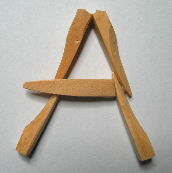 |
A whole alphabet can be created, with many variations:
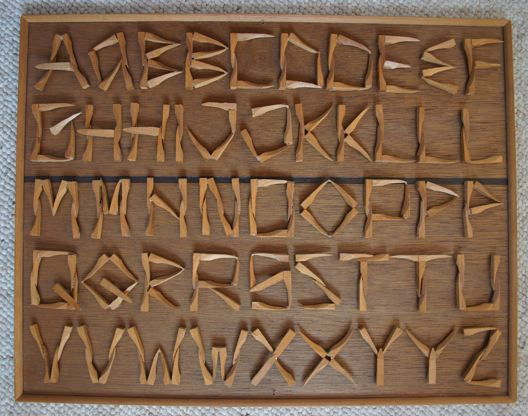 |
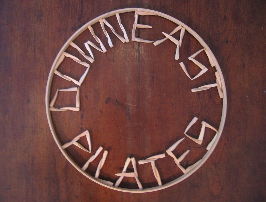
And although they can be presented in a straight line, one of the most aesthetically interesting formats is on the inside of a circle, the most convenient form of which is an embroidery hoop
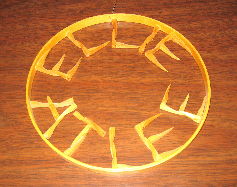 |
This page is a description of the process of making one of those rings.
| 1. |
|
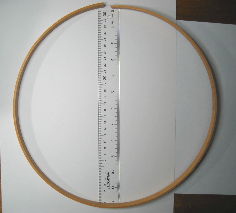
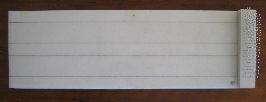
Probably the most important part is to pick a ring into which the letters will fit. Embroidery hoops, which are readily available in sewing shops, come in pairs. There is a continuous inner ring over which the cloth to be embroidered is draped, and then a larger split ring fitted with a clamp, that clamps around the outside of the inner ring to hold the cloth taught for sewing. You tend to use all the continuous rings first, then drill out the clamps on the split rings and glue the free ends of the ring together to make a continuous ring, as will be done here. | ||
| 2. |
|
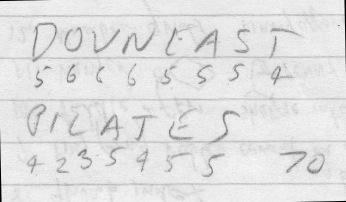
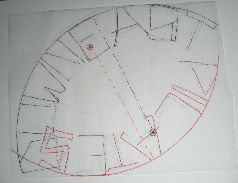
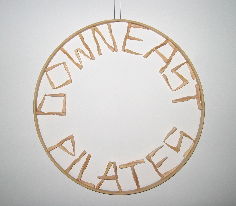
This name ring was being made for a friend of mine who has a local business called Downeast Pilates. So I picked a likely-size ring and traced its curve on some tracing paper. The upper curve with "Downeast" is in black, the lower curve with "Pilates" is in red, with the respective centers circled to line up the letters. Then I traced the letters from the alphabet board. It turned out that they fit well. | ||
| 3. |
|
To assemble the letters for a namering, I use a board I made by mounting on plywood a piece of the dense impact-resistant foam that I found discarded during the renovation of an astroturf practice soccer field at a university where I was working. The foam has guidelines for 2" letters, and is covered with waxed paper so that glue from the letters doesn't stick to the foam work surface. | ||
| 4. |
|
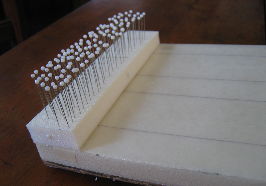
The lobster plugs are glued together. While the glue dries, the lobster plugs are held in alignment and position by pins. Each letter is made up of 2, 4, 5 or 6 plugs, each of which requires numerous pins. I use a total of 120 pins. By the time I run out, the glue on the first letters is dry and I can reuse those pins. It is difficult to pull single pins out of a bowl or other container, so I stick them in the foam before use. During this process, I had them stuck along the upper edge of the foam. But that had the disadvantage of getting in the way as the letters progressed across the board. So I built another block of foam to attach to the board, in which the pins can be stored until work starts, and then moved off the main work surface. |
||
| 5a. |
|
|||
| 5b. |
|
|||
| 6. |
|
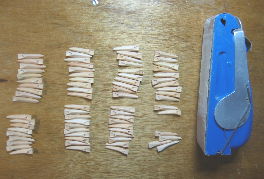
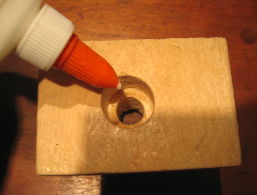
To put everything together, I use Elmer's glue. Another possibility would be Duco cement, but that dries fairly quickly, has an even greater tendency than Elmers to give in to gravity and pool, and any excess is much harder to cut away with a razor knife when it does. Elmers glue used to come in a simple spout bottle with a tiny cap that could be sunk upside down into a block of wood to make a glue stand, so that the inverted bottle would always be ready to use, with glue at the tip, just by pulling the bottle out of the stand. The cap used in the last 20 years or so, however, has an inconvenient twist cap, with no easy way to make a stand for it. I've made a stand by drilling a crude pair of holes in 2" wood (with shims underneath) to keep the bottle upside down. |
||
| 7. |
|
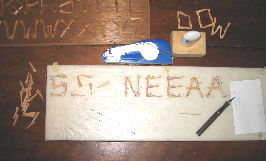
Here's how the project looked underway. I prefer to do identical letters right next to each other to try to achieve consistency. A delay had allowed the "D" "O" "W" to dry, so I removed them (using a thin spatula to separate any stuck parts from the waxed paper, and started the "S"s in their place. | ||
| 8. |
|
Here is the board at the same stage, cleaned up and with the finished letters on display. | ||
| 9. |
|
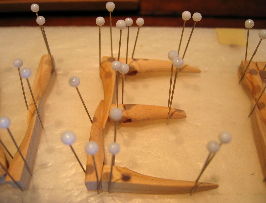
Pins are required for several purposes. One, such as on either side of the three horizontal pieces near their ends (12 pins), is to keep the plugs from rolling over, since the sides of the plugs aren't always perpendicular to their bottoms. Another purpose is to keep plugs from sliding on the work surface, such as at the top and bottom butt ends of the vertical part of the "E" (2 pins). The three along the outside of that vertical part are to keep the horizontals from sliding and pushing the vertical to the left. So the "E" used 17 pins. You can probably see how 120 could be used up fairly quickly. The middle horizontal of the "E" was whittled down a bit and re-sanded. |
||
| 10. |

|
Here's a finished "S" and another getting started. The "S" and the diamond-shaped "O" (see the alphabet, above) are particularly problematic, because they have the plugs joined at their tiny points, which doesn't leave a lot of room for glue strength. Other letters (e.g., "P" and "Q") can be done with point-to-point joins, but the "S" and diamond-"O" are unique in that significant torque can occur when these are not straight up and down in the final arrangement in the ring. Elmer's glue can distort under the influence of gravity in such cases, even when it's dry. During reinforcement (#15) more glue is applied to the tiny joints, but in the end, the only safe approach is to overlay the resulting (hopefully not-to-obvious) Elmer's glob with a layer of Duco cement extending out in both directions from the joint. | ||
| 11. |

|
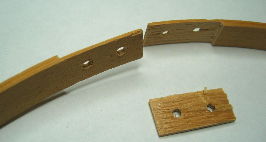
As mentioned earlier (#1), embroidery hoops come in two parts, an inner continuous ring and an outer split ring with a screw clamp attached at the two loose ends to draw them together. In this case, I was working with the split ring. The two sides of the clamp have been removed by drilling out the rivets that hold them in place. | ||
| 12. |
|
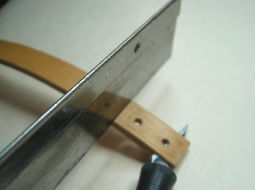
To make a strong join, an overlap needs to be established. Here an overlap that lined up the pairs of holes was used. An Exacto saw was used to cut halfway through (from outside on one end, and from inside on the other), and then an Exacto knife was used to cut lengthwise through the middle ply of the three that make up the ring. | ||
| 13. |
|
The resulting ends were then glued with carpenter's glue, clamped, and put aside for the requisite "overnight." (It makes sense to do this before starting the whole process, but in this case it happened in the middle.) | ||
| 14. |
|
Here are the finished letters, sans pins, laid out on the work board. The joints between long sides of the plugs are plenty strong. However, the joints where an end of a plug is butted up against another plug are subject to leverage strain, and, for durability, need to be reinforced. First, though, I had to deal with the inevitable excess glue that settles onto the board at the back of the letters before it dries, and once dry is a very obvious blemish. It's fairly easy to carve off such chunks of glue with an Exacto knife. |
||
| 15. |

|
The reinforcing requires putting small quantities of glue in the corners of the right-angle joints. The tip of the glue bottle is to thick and uncontrollable for this, so a blob of blue is put on a piece of paper, and a flat toothpick is used to pick up a small amount of glue and set it into each corner. The edge of a finger (the smaller the better) is then drawn across the glue, pressing into the corner, to remove any excess, making an inconspicuous fillet. | ||
| 16. |

|
Once the reinforcements dried, I pinned the ring is down to the work board. In this case, there was a slight twist in the ring which it had not been possible to completely remove by adjusting the ring ends before gluing, so masking tape was used to hold the ring firmly against the board. The letters were then placed in the ring and aligned with each other. Those letters that attach at a single point had to also be aligned with the center of the ring. The final placement had to honor the total width of the word, as calculated at the beginning (#2). Once the letters are in place, they still have to be picked up again to apply glue, so it's helpful to stick a pin in outside the ring at each letter to identify a crucial attachment point for the letter. |
||
| 17. |
|
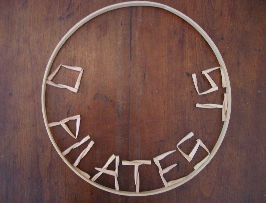
The final touch, once the glue is dry, was to remove the ring from the board and repeat, for the connections of letters to the ring, the process used earlier (#14-15) for removing excess glue and putting in reinforcing fillets. The ring was then left in a vertical position to dry. In this case, as earlier, an extra layer of Duco cement was used to protect the small joint where the "S"s meet the ring. I thought that the ring was finished at this point, but a hard look at it clearly revealed that "EAST" was widely spaced compared to "DOWN." This happened due to a circumstance that had never come up before in the many rings I've done over the year. The "A" is narrow at the top and wide at the bottom, and while this works well when the "A" is in the lower curve of the ring, it doesn't it is in the top curve, especially when it is between two boxy letters -- particularly if they have open space adjacent to the "A.". Although I'd never done it before, I ultimately had to face the fact that a different "A" was needed, and that this would also require re-spacing the whole word. |
||
| 18. |
|
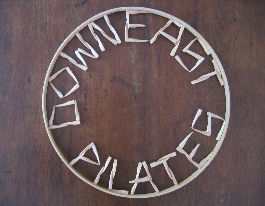
I couldn't change the width of the word, so the "D" and "T" had to remain. The unprecedented removal of letters from the ring would require some manhandling with the Exacto knife, and the "S" was too fragile for that kind of treatment. So "OWNEA" came out, and the knife and sandpaper was used to clean the ring and the letters. A new "A" was made with a wider top. But once the letters were laid out, the "O" looked too large. The only alternative was the "diamond-O," which is tricky because of the small-point connection to the ring. But aesthetically, it had to be done. | ||
| 19. |
|
So the attachment and reinforcement process (#16-17) was repeated for the "OWNEA" letters. The "E" still presented something of a space problem, but there wasn't much that can be done about that. | ||
| 20. |
|
To finish the piece, a fine black bead cord was strung through the former clamp holes to the left of "DOWNEAST"s "E" for hanging. | ||