The Magic of Snow and Fire
Snow Lanterns
|
As you look out your window, you see a passer-by pause and begin to smile. She relaxes, and proceeds on her way, less preoccupied, more aware of her surroundings . . .
What has happened? Is this walk-by psychotherapy? :-) No -- or perhaps yes. This person has just noticed the snow lantern you've built in front of your home.
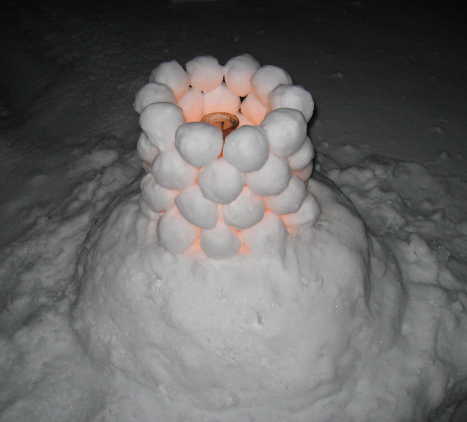
If this hasn't happened to you, it could. It really is remarkable how much people appreciate encountering the gentle, unexpected beauty of snow lanterns. A simple cylinder of snowballs, with the yellow light of a candle flickering inside and glowing out through the thick and thin of the snowballs, a snow lantern is easy to make. All you need is snow. And a candle.
|

|
My partner's family has been making snow lanterns for a LONG time. She can remember her mother doing it when she was a little girl. Her mother did this sketch of a little girl making one.
Here is my partner's version of directions for making one, and the 2-up version (pdf) she cuts in half and passes out to friends and local businesses when snow arrives.
|
|
THE SITE
Make sure that you put the snow lantern where you can see it from a window, and, if you want to share it, where passers-by can see it. You need a flat, horizontal area at least 15" in diameter. Shelter from wind can be a help. (But see Portability, next.)
THE TIMING
|
Temperature and Snow -- If the temperature is close to or above freezing, the snow will pack very well, which at first glance seems helpful. But snowballs made with this snow are "committed" almost instantly. There's not a lot of opportunity to modify shape or size to fit into the ring of snowballs. The "icier" they are, the less likely they are to stick together.
On the other hand, low temperatures mean very dry snow. In addition to making for cold hands, it takes a long time to compact each snowball tight enough so that when you tap it down onto the ones beneath it, or tap another down on top of it, it doesn't break into pieces. With such snow, it's helpful to bring the snow inside and let it warm up a bit, being aware that the snow on the edges of the container will tend to get sticky while that in the middle is still dry.
The Weather -- Warm temperatures or rain, or even very direct sun on a cold day, takes a tremendous toll on a snow lantern. If tomorrow's weather is going to be like that, you have to wonder whether the effort for one night's beauty is worth it. (It probably is.) If you've never seen the skeleton of a bygone snow lantern, here's one :-).
|

|
THE BASE AND OTHER EQUIPMENT
Make a 15" diameter base of packed snow. Make a hole in the middle sufficient to support a candle (unless you have a short candleholder you can use instead).
Portability -- Over the years, given the widely varying wind, snow, and temperature conditions in which the opportunity to build a lantern presents itself, and though it flies in the face of family tradition, it has proven easiest to build the lantern inside and then move it to wherever you want it. Here's the approach I have used:
- Start with a shallow tray or pan. I use a 15" aluminum pizza pan.
- Set a small candle-holder in the pan's center. You can just punch a hole in the snow instead of using a candle-holder, but after the first candle burns down and melts the snow, a second one will be harder to manage.
- Pack a layer of snow around it, up to a bit above the rim of the pan, being careful to keep the snow level at the edge, rather than sloping outward.
- If you're going to use a wind-protector (see Wind-proofing, below), make an impression for it by pressing it into the snow around the candle-holder and then removing it.
|

|
This makes a firm base, enabling you to carry the lantern to where you need it -- even in a car or a procession, if the way is smooth and the lantern solid.
THE SNOWBALLS
Make a ring of 8 to 10 tightly-packed snowballs on the base (4" in diameter is a nice size to work with), each touching its neighbors. Place a second tier of snowballs atop these, resting each snowball in the space between the two snowballs below it. Repeat this for another two tiers, making a cylinder of snowballs four tiers deep and open at the top.
FINISHING IT OFF
Put a candle in the hole or candleholder in the base. When it is dark outside, light the candle. If it is windy, see Hint 4, below. Let the lantern's magical glow captivate you. The flickering, and the darkness and lightness of light coming through the thick middles and thinner edges of the balls and the spaces between, is always a wonderful surprise.
HELPFUL HINTS
- The snow -- I tend to need a 5-gallon bucket plus a regular kitchen pail, pressed down. See Timing, above, for notes on the effect of temperature on how the snow handles.
- Your hands -- You can make tight snowballs and keep your hands dry and more-or-less comfortable at the same time by using rubber gloves.
- Setting the balls -- When you set the balls in place, do it with a tapping-into-place motion, which makes them stick to their neighbors better. In the higher tiers, it's good to steady the surrounding wall with your other hand to keep the tap from collapsing it. Placing the last ball in a row is the riskiest moment. Tapping too wide a ball into place can literally explode the whole structure, so it pays to shape and size that last ball carefully. Expect a collapse now and then :-)
- Dealing with Wind

|
Windproofing -- You can make a windproof snow lantern by setting down an oil-lamp chimney, available from most hardware stores, around the candle (see The Base and Other Equipment, above).
If you can't find a lamp chimney, you can make a serviceable one by cutting the bottom off a suitable-sized jar, such as a quart canning jar (left). You can do this by tying a piece of string tightly around the jar where you want the cut to be, soaking the string with lighter fluid, igniting it and letting it burn for several seconds, and then dipping the jar into cold water. The bottom will normally crack right off, and you can mold masking tape around the edge to prevent cuts.
Lighting the candle in wind -- Lighting the candle first and then setting the protector around it is easy, unless the wind insists on instantly blowing the candle out. You can light the candle inside the protector using a long match, or a kitchen tongs holding a match, but more than likely the wind will blow the match out first. To get around this, you can light the candle inside the house, hold it with a tongs inside the protector (right) while you carry it outside to the lantern and place it in the holder, and then quickly flip the protector into place.
|

|
Updated 23 February 2019

